
| 일 | 월 | 화 | 수 | 목 | 금 | 토 |
|---|---|---|---|---|---|---|
| 1 | 2 | 3 | 4 | 5 | ||
| 6 | 7 | 8 | 9 | 10 | 11 | 12 |
| 13 | 14 | 15 | 16 | 17 | 18 | 19 |
| 20 | 21 | 22 | 23 | 24 | 25 | 26 |
| 27 | 28 | 29 | 30 |
- Visual SLAM
- 티스토리챌린지
- C++
- ROS
- WSL2
- 강화학습
- ROS2
- RTK
- QT
- ubuntu
- turtlebot3
- GUI
- 터틀심
- DevOps
- 자율탐사
- 로봇
- WSL
- U-blox
- Jetson
- SLAM
- 젯슨
- 오블완
- turtlesim
- Gazebo
- 자율주행
- GPS
- ZED2
- Puck LITE
- 인공지능
- Simulation
- Today
- Total
직관적인느낌
AI로 작물의 상태를 확인해보자! yolov8 (detection/segment) 본문
1. 자료조사
1. Object Detection with YOLOv8
https://velog.io/@choonsik_mom/Object-Detection-with-yolo-NAS-zpetis4o
Object Detection with YOLOv8
YOLOv8에 대해 간략히 알아보고, 코드로 적용해 보자
velog.io
2. yolov8 custom training / YOLOv8 커스텀 학습 하는 방법
https://m.blog.naver.com/jong_jh_/222984251856
yolov8 custom training / YOLOv8 커스텀 학습 하는 방법
학기중에 yolov5 를 활용해서 사람얼굴과 번호판을 인식해 블러처리 해주는 프로젝트를 했었는데요 22년 7...
blog.naver.com
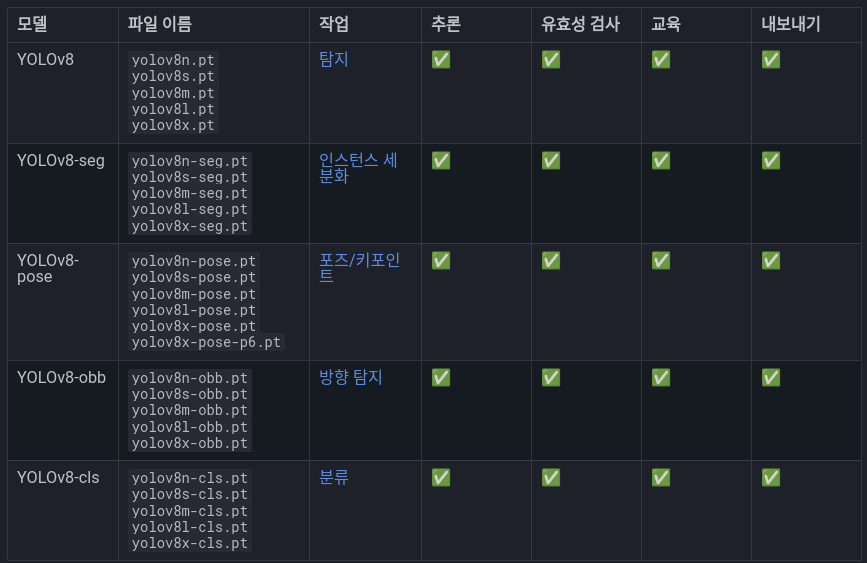
3. Ultralytics YOLOv8 - 공식 문서
https://docs.ultralytics.com/ko/models/yolov8/
YOLOv8
다양한 작업을 위해 사전 학습된 다양한 모델을 사용하여 성능을 최적화하는 실시간 객체 감지의 최신 기술인 YOLOv8 을 살펴보세요.
docs.ultralytics.com
4. 설치
https://docs.ultralytics.com/ko/quickstart/#install-ultralytics
빠른 시작
Learn how to install Ultralytics using pip, conda, or Docker. Follow our step-by-step guide for a seamless setup of YOLO with thorough instructions.
docs.ultralytics.com
5. github - ultralytics : YOLOV11
https://github.com/ultralytics/ultralytics
GitHub - ultralytics/ultralytics: Ultralytics YOLO11 🚀
Ultralytics YOLO11 🚀. Contribute to ultralytics/ultralytics development by creating an account on GitHub.
github.com
- 이건 YOLO11 모델
+) mqtt를 이용한 이식
https://m.blog.naver.com/gyeongjuhs/223608825480?recommendCode=2&recommendTrackingCode=2
2. MQTT를 이용한 실시간 객체 탐지 영상 전송과 수신
AI 서버에서 처리한 영상을 자바 웹에 실시간으로 전송하고 모니터링하는 서비스를 구축하는 방법 환경설...
blog.naver.com
2. 시작하기
- 출처 자료
https://webnautes.tistory.com/1851
YOLO v8 사용해보기
웹캠 영상을 입력으로 하여 YOLO v8을 실행해봅니다. 2023. 5. 8 최초작성 2023. 9. 28 링크 오류 수정 2023. 10. 3 CUDA 사용하기 위해 필요한 점 수정 관련 포스트 Yolo v8 pose 사용해보기 https://webnautes.tistory.c
webnautes.tistory.com
1. 사전 설치
pip3 install ultralytics
2. 소스코드
" vscode에서 실행한 코드"
import cv2
from ultralytics import YOLO

# Load the YOLOv8 model
model = YOLO('yolov8n.pt')

# 동영상 파일 사용시
# video_path = "path/to/your/video/file.mp4"
# cap = cv2.VideoCapture(video_path)

# webcam 사용시
cap = cv2.VideoCapture(0)

# Loop through the video frames
while cap.isOpened():
    # Read a frame from the video
    success, frame = cap.read()

    if success:
        # Run YOLOv8 inference on the frame
        results = model(frame)

        # Visualize the results on the frame
        annotated_frame = results[0].plot()

        # Display the annotated frame
        cv2.imshow("YOLOv8 Inference", annotated_frame)

        # Break the loop if 'q' is pressed
        if cv2.waitKey(1) & 0xFF == ord("q"):
            break
    else:
        # Break the loop if the end of the video is reached
        break

# Release the video capture object and close the display window
cap.release()
cv2.destroyAllWindows()
3. 실행 결과


4.리뷰
출력된 창을 보면,
1 person, 1 couch, 1 bed, 1 tv가 출력되고 있음을 보인다.
현재 tv가 없기 때문에 인식을 잘못하고 있는것으로 나타난다.
5. 추가
추가로 모델의 종류(segment) 변경하여 테스트 하였다.


'스마트팜 완전 자동화' 카테고리의 다른 글
| 스마트팜 및 식물공장에서의 2D LiDAR 기반 자율 탐사 로봇 적용 방안 (0) | 2024.11.21 |
|---|---|
| 스마트 팜에서의 AMR 카메라 안정화를 위한 패시브 서스펜션 적용 방법 (0) | 2024.11.12 |
| 로봇을 활용한 식물 재배: YOLOv8n Instance Segmentation과 Depth 카메라를 통한 3차원 좌표 추출 (0) | 2024.11.11 |
| 보기(bogie) 방식과 로커 보기(rocker-bogie) 방식의 동력보조 카트 설계 (0) | 2024.10.25 |
| 동력보조 카트 설계 및 모터 제어 가이드 (1) | 2024.10.25 |